Wednesday, December 3, 2008
Continued Work on HS
Tad stopped by after work today and we got 3.5hrs in on the Horizontal Stabilizer. Now both sections have been assembled and match drilled. Need to debur and dimple and then decide on the priming we want to do.
Monday, December 1, 2008
Emp. Kit progress
Yesterday Tad and I got 7hours of work done on the tail kit. I had mostly done a lot of deburring beforehand so we only spent a couple of hours match drilling a few areas, like the forward attachment brackets (908's) and cleaning up one last rear spar. I had to leave some of it for Tad to work on after all... he's half owner in this too!!
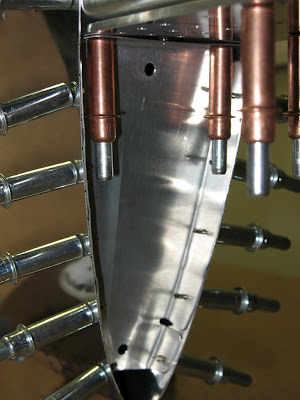
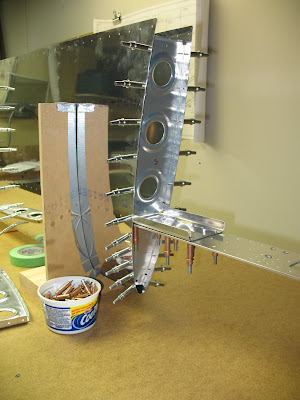
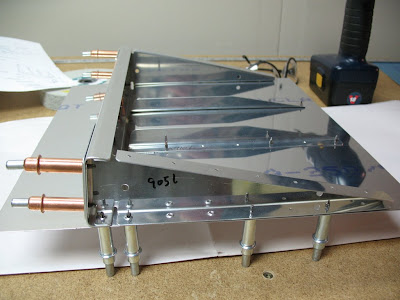
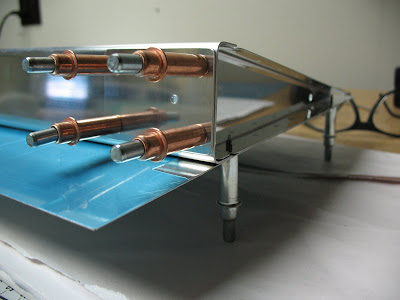
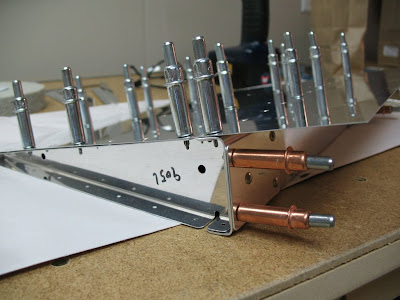
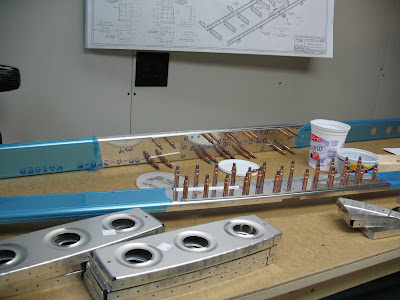
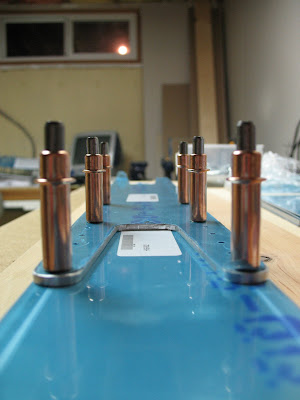
After all the Ribs, Spars, Doublers were match drilled and deburred Tad went to the shop to cut out the Jig Cradles for the Horizontal Stabilizer. He came back with them perfectly cut out and ready to be fastened to the workbench. We made sure everything was level and then dropped the first skin into the Jig. We managed to get all the nose ribs clekoed in and a few of the ribs. still have to cleko the skin to the spar and drop in a few more ribs. Then we'll match drill this and then debur and dimple / countersink where needed.
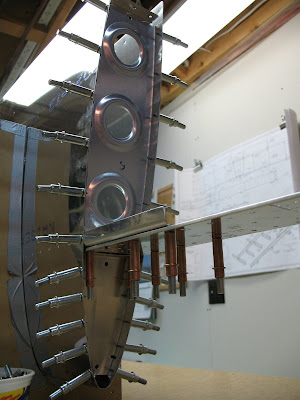
We are happy with the progress so far. Getting the nose ribs on the inward side was a little tricky but a small flute allowed it to drop in quite nicely. No issues so far and everything is lining-up really well.
Next build time will be tomorrow (Tuesday night) ....
 |
| From Pete and Tad's RV-9a Build |
After all the Ribs, Spars, Doublers were match drilled and deburred Tad went to the shop to cut out the Jig Cradles for the Horizontal Stabilizer. He came back with them perfectly cut out and ready to be fastened to the workbench. We made sure everything was level and then dropped the first skin into the Jig. We managed to get all the nose ribs clekoed in and a few of the ribs. still have to cleko the skin to the spar and drop in a few more ribs. Then we'll match drill this and then debur and dimple / countersink where needed.
We are happy with the progress so far. Getting the nose ribs on the inward side was a little tricky but a small flute allowed it to drop in quite nicely. No issues so far and everything is lining-up really well.
Next build time will be tomorrow (Tuesday night) ....
| From Pete and Tad's RV-9a Build |
 |
| From Pete and Tad's RV-9a Build |
 |
| From Pete and Tad's RV-9a Build |
 |
| From Pete and Tad's RV-9a Build |
 |
| From Pete and Tad's RV-9a Build |
Friday, November 28, 2008
Practice Kit Work...
I worked on the Practice Kit some more from Van's and have made some good progress now that I have some the proper tools required.
I had a hard time with the countersinking on the spar and later discovered the thickness wasn't enough to use the Machined Tool for it. Too late for the one side. So I made them 4 size and continued on. On the other side of the spar i used the hand dimpling tool and then manually used the speed deburring bit to take just a little more out...testing with a 3 size as I went. It didn't need too much more after dimpling it.
So now i have the skins dimpled and 3 of the 4 skin stiffeners riveted on. It's coming together!!
I also drilled the trailing edge at the required angle of 84 degrees. Still need to counter sink the trailing edge stiffener.
 |
| From Pete and Tad's RV-9a Build |
 |
| From Pete and Tad's RV-9a Build |
 |
| From Pete and Tad's RV-9a Build |
 |
| From Pete and Tad's RV-9a Build |
 |
| From Pete and Tad's RV-9a Build |
Friday, November 21, 2008
Kit Progress
it's been a bit since i last posted. basically i haven't done too much on the practice kits since i'm waiting for a few more tools to arrive. a dimpler for one so i can get the skins done.
in the mean time i've built another bench for the grinder and drill press. the grinder works very well for the deburring. needed to remove all the covers on it so i can debur long pieces a little easier.
i've worked about 4hrs. so far on deburring the tail kit... mainly the HS spars and all the ribs. match drilled the spar doubler plates as well. i've probably spent more time just reading the notes and studying the drawings to try to get a good understanding of the process. it's been a slow start but once the rest of the tools arrive, then tad and i will probably spend a few good hours working on it.
Did a XC solo flight to Fairmont... a pic of the Rocky Mountains off my right wing...
in the mean time i've built another bench for the grinder and drill press. the grinder works very well for the deburring. needed to remove all the covers on it so i can debur long pieces a little easier.
i've worked about 4hrs. so far on deburring the tail kit... mainly the HS spars and all the ribs. match drilled the spar doubler plates as well. i've probably spent more time just reading the notes and studying the drawings to try to get a good understanding of the process. it's been a slow start but once the rest of the tools arrive, then tad and i will probably spend a few good hours working on it.
 |
| From Pete and Tad's RV-9a Build |
 |
| From Pete and Tad's RV-9a Build |
Did a XC solo flight to Fairmont... a pic of the Rocky Mountains off my right wing...
 |
| From Pete and Tad's RV-9a Build |
Sunday, November 9, 2008
Projects
so i have been working away on the practice kits supplied from Van's. they have been great in helping me understand the process of aircraft construction.
like others have wrote, the toolkit was pretty basic and more a matter of getting used to all the tools involved. riveting, dimpling, de-burring, etc.
with the second kit underway, i've had a chance at some countersinking in a piece of angle aluminum. flush riveted and universal rivets were used to secure it.
i discovered i will be needing a c-frame or DRDT-2 to get the skins dimpled in the next project and a pull riverter. also need to acquire a bench grinder to mount on the 3M scotchbrite wheel for deburring. a vixen file would be handy too!
i will post up some photos of the kits so far!
like others have wrote, the toolkit was pretty basic and more a matter of getting used to all the tools involved. riveting, dimpling, de-burring, etc.
with the second kit underway, i've had a chance at some countersinking in a piece of angle aluminum. flush riveted and universal rivets were used to secure it.
 |
| From Pete and Tad's RV-9a Build |
i discovered i will be needing a c-frame or DRDT-2 to get the skins dimpled in the next project and a pull riverter. also need to acquire a bench grinder to mount on the 3M scotchbrite wheel for deburring. a vixen file would be handy too!
i will post up some photos of the kits so far!
|
| From Pete and Tad's RV-9a Build |
Tuesday, November 4, 2008
Van's Test Flight
OK... the weather was somewhat rainy and cool but Tad and I managed to get down to Aurora to visit Vans Aircraft. We went on the little tour they give and talked airplanes for the entire morning. Joe was able to give us both a ride in the 9a and Tad and I were completely amazed by just about everything that plane has to offer. We did some slow flight, simulated go-arounds with full flaps(amazing climb out) , a couple of wing overs and a real nice short field landing! i was blown away by the range this plane has. How about the feet on the floor stalls, turns....hahaa amazing really!
As you can see by the smile on our faces!


Needless to say we came home with each a share in the tail-kit!
As you can see by the smile on our faces!


Needless to say we came home with each a share in the tail-kit!
Friday, October 31, 2008
Waiting for Tools
Well, it's the end of the month and i'm just placing an order for some tools. just a few items but items needed to complete these practice kits.
i'm getting the tools from Isham and have heard good things about them. we'll see i suppose.
so, i'm still working away on the small shop and am going to be doing some additional wiring to give more outlets for tools,etc.
tad and i are planning a trip to Van's down in Oregon but not sure if the weather is going to be good enough to spend the time to drive down. i hope so because it's getting close to winter and our available time will probably limited in the next little while.
still not completely sure on which kit we'll be doing just yet... might have to change the blog!!!
anyway, that is all for now. not too much news.
i'm getting the tools from Isham and have heard good things about them. we'll see i suppose.
so, i'm still working away on the small shop and am going to be doing some additional wiring to give more outlets for tools,etc.
 |
| From Pete and Tad's RV-9a Build |
tad and i are planning a trip to Van's down in Oregon but not sure if the weather is going to be good enough to spend the time to drive down. i hope so because it's getting close to winter and our available time will probably limited in the next little while.
still not completely sure on which kit we'll be doing just yet... might have to change the blog!!!
anyway, that is all for now. not too much news.
Friday, October 24, 2008
Getting Started
Well, this will be the home of the RV-9a project Tad and I hope to start sometime soon.
So far, i've done some changes to my basement and prepared a little more room to work during the winter months. Still have more to do, but it mostly cleaned out now. I also built the EAA table with my own specifications. I also installed some locking casters for ease of movement. I'll be adding another table soon to allow more room to build!
.JPG)
For now, i've ordered the 2 practice kits from Van's and have had a quick look at them. Tad already has a few tools that he's dropped by but not enough to complete the kits. still need some dimple dies, squeezer, drill bits(#30,#40). he has the riveter(2x), air drill, deburring tool, clamps,etc. so that will help a lot!
 |
| From Pete and Tad's RV-9a Build |
Here is a pic of the stiffener that i need to shape and cut to proper size. when i pulled this out from the box i noticed the end has been cut very short. you can see the rivet hole is very close to the edge. this is how it came from Van's!!!

So, i've got both practice kits on the bench. reading over the instructions,etc. and getting familiar with the process and parts.
I still need to get some more tools to really get into these!
Thursday, October 16, 2008
Subscribe to:
Posts (Atom)